Convert anything or everything into coin operated, bill operated, card operated.

- Hardware Timer Controlled turn XBOX 360 or XBOX ONE , Play station 3 or 4, Xbox, PS 2, Power Device, laundry into coin op
- Turn your PC into Coin operated Internet, kiosk Game Kiosk, Application Kiosk System (WS)
- Internet Cafe, Cyber Cafe, Game Cafe Self Service Payment System (ICPS), Turn internet cafe into coin op
- Parts: Universal Multi Coin Acceptor AK5
- Note Validator / Bill Acceptor for Internet Kiosk
- Internet Cafe Kiosk Interface Board,(interface with any thirdly party coin acceptor and bill acceptor)
-
phone:905-279-7845 sales@weavefuture.com
-
 Products
- Xbox Playstation Wii U
- Card Operated for Wireless Controller
- Bill Operated Card Loader
- Card Loader by PC
- Customer Smart Cards
- Coin Operated for Wireless Controller
- Bill Operated for Wireless Controller
- HDMI Media Player
- Card Operated for Wired Controller
- Coin Operated for Wired Controller
- Bill Operated for Wired Controller
- Old WII TV
- Old Xbox
- PS2
- PC
- Washer Dryer
- Coin/Bill Operated Internet Kiosk
- Coin/Bill Operated Internet Cafe
- Water Vending
- Coin/Bill Operated Other Devices
- Jukebox Software
- Photo Booth Software
- Donation Box Software
- Metal Enclosures
- Helps and Forums
- Pictures from Customers
- Older Pictures
- Contact us
- Old Pages
- Xbox Playstation Wii U
 Xbox/Plastation/WII
-
 Wahser/Dryer
-
 Smart Card System
-
 Others
-
 Customers' Pictures
-
 Shop
Shop
 Forum
Forum Gallery
 Home
HomeWeavefuture Coin Acceptor AK5 System

Version: 1.0
Date: 10/31/2005 1:01:00 AM
Table of Contents
TOC \o "1-3" \h \z 1 Weavefuture Coin Acceptor AK5 System Composition
2 Weavefuture Coin Acceptor AK5
2.1 Weavefuture Coin Acceptor AK5 Features
2.3 Output Connect to PC through RS232 Cable
2.4.1 Erase the previous all coin group values setting
2.4.2 Erase the previous one coin group values setting
2.4.3 Erase the previous coin value factor setting
3.1.1 Check you PC’ Com port availability
3.1.3 Configure the Weavefuture Coin Acceptor Driver and Usage of PC
3.1.4 Install Weavefuture Coin Acceptor Service Driver
3.1.5 Test Weavefuture Coin Acceptor AK5 and software
4 Weavefuture Internet Kiosk Browser
1 Weavefuture Coin Acceptor AK5 System Composition
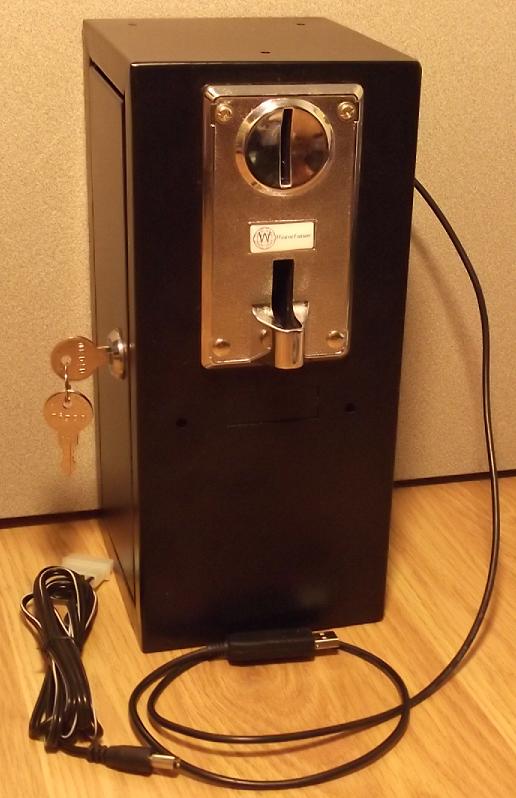
Weavefuture AK5 Multiple Coin Acceptor System is built for Internet Cafe and Internet Kiosk. It has patent pending solution. The Weavefuture Coin Acceptor AK5 System include:
l Include Weavefuture Coin Acceptor AK5
l include Weavefuture Coin Acceptor AK5 Service Driver working with Windows 2000/XP
l include Weavefuture Internet Café Kiosk Timer 1.0 tested on Windows 2000/XP
l include Free Weavefuture Internet Kiosk Browser 1.0 tested on Windows 2000/XP
l include RS232 Cable
l include 110V AC adaptor
l .
l You just connect it to PC and install the software as administrator, run it as limited user, and then you turn your PC into self-service Internet Cafe Machine.
2 Weavefuture Coin Acceptor AK5
Weavefuture Coin Acceptor is made for PC kiosk, it could not work with itself, and it has to work with Weavefuture Software kits include in this documents
2.1 Weavefuture Coin Acceptor AK5 Features
Armed with the powerful electronic microcontroller, (like a small computer system) the AK5 can automatically identify the coin by material, thickness and diameter. AK5 is designed as simple and stupid as possible.
l Multiple coins
It designed to set 5 different output value groups at the same time; every output value set can program 10 types’ coins.
Different output values mean number of output pulse.
l Setup coins by training
Programming the type of coin by training, when AK5 is in programming mode it memorize the data of material, thickness and diameter of the coins. When AK5 is in working mode it will recognize the coins by a complicated calculation and process these memorize data.
l Adjustable the recognized accuracy
There is a switch in the AK5 can adjust the accurate degree of recognizing sensitive.
l Alarm guard system.
The AK5 has software guard system; this guard system has alarm, which prevents opportunistic behaviors.
2.2 Specifications
l Apply to coin’s diameter = 18m/m - 29m/m
l Apply to coin’s thickness = 1.2m/m - 3.0m/m
l Work voltage = DC12V ± 20%
l Current in 50MA in power saving mode, wake up mode 500MA
l Temperature =-20C~50C
l Setting Switch set the AK5 to working mode (switch to start) or set the programming mode (switch to set)
l Adjust Setting Switch, which for adjusting the coin’s value, can set the coin value, when the AK5 in programming mode (Setting Switch switch to set)
o When the Sensitive Switch also switch to NOM, ”00-99” means how many times of the output pulse signal will be sent when the programmed coin was deposited,. ������01” means this group may output 1pulse.
l Sensitive Switch when the AK5 in working mode, it is for accepting the coin’s sensitive degree, it detects the difference between real/fake coins when inserted. when AK5 in programming mode, it also help the setup the coin output value
l Please turn on power about 10 minutes before using or setting you can get the optimal effect.
l Connecting instructions of connector:
Red line ―��DC+12V
Black line ――GND(Ground)
2.3 Output Connect to PC through RS232 Cable
Although the output is RS232 Cable, but it not follow the RS232 standard, It designed only used for Weavefuture Coin Acceptor AK5 only, and it should not used for other usage, otherwise may cause damages
2.4 Programming Procedure
2.4.1 Erase the previous all coin group values setting
· Turn the sensitive switch to stir to the ���NOM” position
· Turn the setting switch to stir to the “SET” position enter programming mode, LED display “00”
· Keep press the coin adjust switch more than 5 seconds until you will be hear a “BI” sound and LED will display “C”, this moment is all the coin value setting is erased
· Turn the setting switch to stir to the “START” position exit programming mode
2.4.2 Erase the previous one coin group values setting
This is only for advance user.
· Turn the sensitive switch to stir to the “NOM” position
· Turn the setting switch to stir to the “SET” position enter programming mode, LED display “00”
· Press the coin adjust switch to adjust the coin value in turn and let the LED display the value, which you want to erase.
· Keep press the coin adjust switch for more than 5 seconds until you will be hear a “BI” sound and LED will display “C”, this moment is this coin group value setting is erased
· Turn the setting switch to stir to the “START” position exit programming mode
2.4.3 Erase the previous coin value factor setting
· Turn the sensitive switch to stir to the “MGN” position
· Turn the setting switch to stir to the “SET” position to enter programming mode, LED display “P2”
· Keep press the coin adjust switch for 10 seconds until you will be hear a “BI” sound and LED will display “C”, this moment is the coin value setting is erased
· Turn the sensitive switch to stir to the “NOM” position
· Turn the setting switch to stir to the “START” position to exit programming mode
2.4.4 Set coin group values
· Turn the sensitive switch to the “NOM” position
· Turn the Setting Switch to the “SET” position enter programming mode, LED display “00”
· Press the Adjust Setting Switch to adjust the coin value in turn and let the LED display the value, which you needed, for example “01” or “02”. The value increase 1 upon 1 press. If you passed the value you want to set, just turn the setting switch to stir to “START” then turn back to “SET” again the LED will display “00”, so you can select the value again. This number stands for Coin ID in PC
· Deposit the coins in turn, you can program up to 10 coins .If less than 10 coins can add and store later. For example you can prepare 10 quarters as different condition as possible. Or you can deposit 10 same or different tokens.
· Repeat above two steps to set other coin group values.
· Turn the setting switch to stir to the “START” position to exit programming mode
2.5 Example a : Setup for Canadian Nickel(0.05), Dime (0.10), Quarter(0.25), Loony($1.00), Toony ($2.00)
1. Clear all the settings. Do the 2.4.1 and 2.4.3 to erase previous settings.
2. Prepare 10 Canadian Nickels, 10 Canadian Dimes, 10 Canadian Quarters, 10 Loonies, 10 Toonies.
3. Turn the sensitive switch to NOM
4. Turn the Setting Switch to SET going to Programming mode, the display will show “00”
5. press Adjust Setting Switch once, the display will show “01” which stands for Coin ID= 1 in PC, drop the 10 nickels in sequence, when you drop the 10th nickels, the display will show “F” means the setting is done.( if you accident press more times, for example the display show “01” or “02”, then turn the Setting Switch to START, then turn Setting Switch to SET again the display will show “00”. So you can do the this step)
6. press Adjust Setting Switch once, the display will show “02” which stands for Coin ID= 2 in PC, drop the 10 Dimes in sequence, when you drop the 10th Dime, the display will show “F” means the setting is done
7. press Adjust Setting Switch once, the display will show “03” which stands for Coin ID=3 in PC, drop the 10 quarters in sequence, when you drop the 10th quarter, the display will show “F” means the setting is done.
8. Press Adjust Setting Switch3 times until the display show “04” which stands for Coin ID= 4 in PC, drop the 10 Loonies in sequence, when you drop the 10th Loonies, the display will show “F” means the setting is done.
9. Press Adjust Setting Switch 4 times until the display show “05” which stands for Coin ID= 5 in PC, drop the 10 Toonies in sequence, when you drop the 10th Toonies, the display will show “F” means the setting is done.
10. Turn Setting Switch to START, then your AK5 is ready to use.
11. When you drop 1 nickels, it will send to PC as Coin ID= 1; drop 1 Dime, it will send to PC as Coin ID= 2; drop 1 quarter, it will send to PC as Coin ID=3; drop 1 Loony it will send to PC as Coin ID= 4; drop 1 Toony it will send to PC as Coin ID= 5;
12. Please reference the software Weavefuture Coin Acceptor AK5 Config part for detail
3 Weavefuture Internet Café Kiosk Timer 1.0 Installation (include Weavefuture Coin Acceptor AK5 Driver)
Weavefuture Internet Café Kiosk Timer is software, it include Weavefuture Coin Acceptor Ak5. It is tested only in Window2000/XP and you also need install Internet Explore 6.0 or above version.
3.1 Installation Procedure
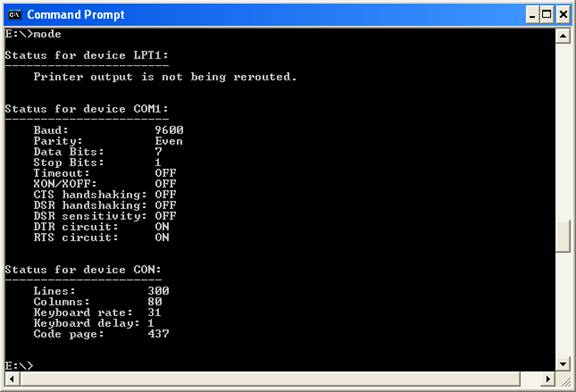
3.1.1 Check you PC’ Com port availability
Most current PC have only one com port, usually is COM1
Press
CTRL+ESCAPE for the Start Menu.
Press R for run.
Type COMMAND.
Press ENTER.
Type CD\ and press ENTER.
Type Mode com1
You will see message show on Status for Device COM1 or COM2, COM3.
That means you have available Com port to use.
In this case, as following picture is COM1 available, now you can connect the Weavefuture Coin Acceptor AK5’s RS232 cable (this cable is specially made for AK5, do not use it for other device or use other RS232 cable for AK5, do so may cause damages) to the COM1 port of your PC.
3.1.2 Install the software.
l Login Windows 2000/XP as a user of Administrator.
l Download software from http://www.weavefuture.com where you will be informed the detail URL location after you purchase the Weavefuture Coin Acceptor AK5 System.
Do not install the software until you have hardware Weavefuture Coin Acceptor AK5 configured and attached the its RS232 Cable to the right com port of you PC (default COM1), otherwise it may cause you PC to locked and you have to reinstall Operation System.
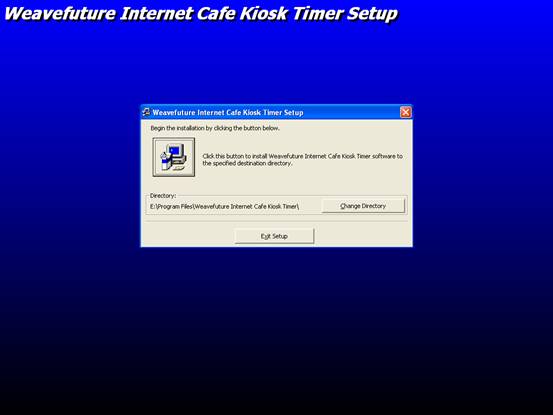
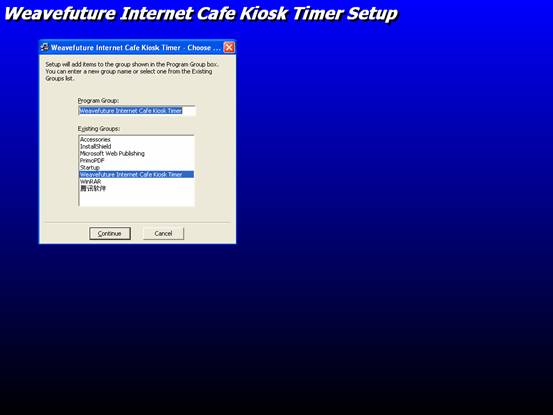
l Click downloaded software Weavefuture Internet Café Kiosk Timer.
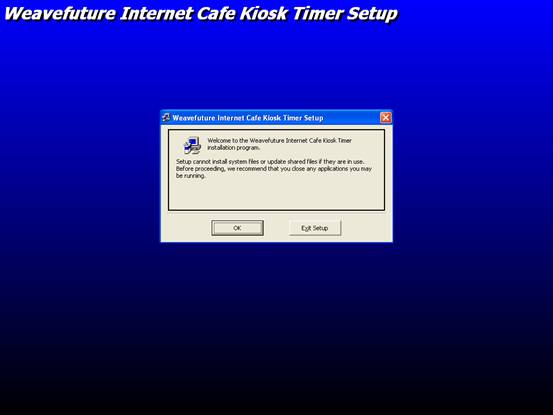
l Unzip WeavefutureKioskTimer.zip to a temper directory and then click to run the Setup.exe by double click it in the Windows Explore (not IE)

3.1.3 Configure the Weavefuture Coin Acceptor Driver and Usage of PC
Press
CTRL+ESCAPE for the Start Menu.
Press R for run.
Type COMMAND.
Press ENTER.
in the Command Prompt go to the E:\Program Files\Weavefuture Internet Cafe Kiosk
Timer
Directory and type WeavefutureCoinConfig.exe and press ENTER.

The following Config Window show:
The Com port is default COM1.
Coin ID is 1,2,3,4,5 have to match with the hardware Coin Acceptor AK5’s configuration, detail see 2.5 example of Canadian Nickel(0.05), Dime (0.10), Quarter(0.25), Loony($1.00), Toony ($2.00)

This is default setting for Canadian Coin Sets. If you want to change check the check box “Make Change” and click “Save Change” after you done the change
The Com Port default is COM1; you may change it to match your PC’s Com port, which attached the Weavefuture Coin Acceptor AK5.
For Example: The above picture show that I change the 5 cent CAD coin only can use computer for 0.5 minute (30 seconds).
Important: Program will start default to run “Weavefuture Kiosk Timer Test”, which will not lock the screen and special keys.
After finish test for coin acceptor successfully, then you can select ��RUN Weavefuture Kiosk Timer��� and save the change.
3.1.4 Install Weavefuture Coin Acceptor Service Driver
Press
CTRL+ESCAPE for the Start Menu.
Press R for run.
Type COMMAND.
Press ENTER.
in the Command Prompt go to the E:\Program Files\Weavefuture Internet Cafe Kiosk
Timer
Directory and type “CoinService.exe –service” and press ENTER.

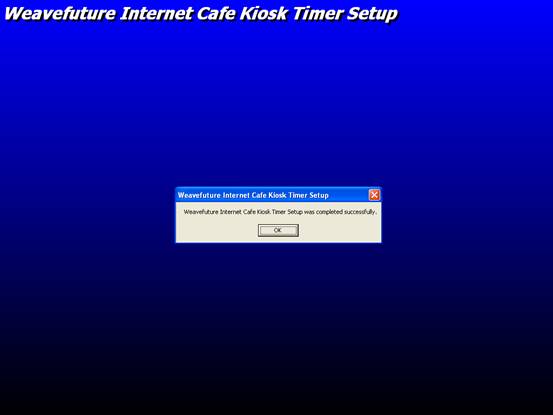
Now you finished the Installation. Reboot you PC and re Login as Administrator and you will see that a Weavefuture Kiosk Timer Test application is running.

The following topics are for advanced user, so you do not have to reboot the PC
How do you know your driver is installed or not?
Please check it in the Service Window.
Open Windows Start->Control Panel->Administrative Tools->Services

If you see CoinService under Services Window, it means the driver is installed successfully then right client it and select “Start” in a Pop Up menu, or
Your will see the Weavefuture AK5 Coin Acceptor Service Driver, “CoinService” ‘s Status is Started and a Weavefuture Timer Tester is running.
3.1.5 Test Weavefuture Coin Acceptor AK5 and software
Drop the coins set you have set up to test if the AK5 Coin Acceptor is working.
I drop a CAD Quarter, it give me 5 minutes to use PC.
Continue test other Coins to see if the AK5 response or if the value of usage is right.
When Timer run to zero, the following window will show:

(The PC will be locked if you select to run Weavefuture Kiosk Timer instead of Weavefuture Kiosk Timer Test in the Weavefuture Coin Acceptor Config)
Drop a Quarter it will give me 5 Minutes, the timer will show again.
(It
show 4:48 because I could catch screenshot quickly)
Now after test the is successful you can go back to Weavefuture Coin Acceptor AK5 Config (see 3.1.3)
Change the configuration as run the “Weavefuture Kiosk Timer”
By select “RUN Weavefuture Kiosk Timer”
Reboot the PC and start the PC as other limited user, now you can only
If you change the configuration to Run Weavefuture Kiosk Timer, You could not access to your PC unless there is usage time left on you PC. You have to drop the coin in order to use your computer, even.
4 Weavefuture Internet Kiosk Browser
Weavefuture is multiple tabs Internet Browser build especially for self-service Internet Kiosk.
This software tested only on Windows 2000/XP and need Internet Explore 6.0 and up installed.
This software will disable special keys like “Ctrl-Alt-Del�������, “Alt Tab”, etc. and clean up the desktop and task bar etc.
You can use this downloaded software only for evaluation propose, you have to send the Demo ID to our company and make payment in order to use it.
4.1 Installation Procedure
Login to Windows 2000/XP as a user of Administrator.
Download the demo software from http://www.weavefuture.com/download/WeavefutureKioskBrowser.msi
Unzip it to a temporary directory, and go to the temporary directory and double click the Setup.exe in the Windows Explore (not IE).
Following the procedure as show in the screenshot to install the software

You need to check the Everyone
4.2 License Procedure
Send the Demo ID to sales@weavefuture.com and make payment in our website. We will send you a license file by email and you put this license file into the directory where you installed the Weavefuture Internet Kiosk Browser.

The Demo version ID can be found on when you click the Exit Button at top-right corner of the browser’s window. A message box looks like following picture will pop up.

The coin acceptor and note validator/bill acceptor accept allmost all country's currency.
North American: US, Canada, Mexico, Bahamas, Brazil, etc.
European: Belgium, German, France, Spain, UK, Island, Czech Republic, England, Iceland, Italy, Norway, etc.
Asia: Thailand, Singapore, Australia, China, Hong Kong, Philippines, Turkey, etc. and many more.
please send to sales@weavefuture.com to ask.
We provide our products to:
.Arcade
.Laundromat
.Internet Cafe
.Internet Kiosk
.Car Wash
.Water dispenser
.any other power devices
All the products have 1 year warranty for exchanging to same model and repairing if there is defect. no return for refund for return.