Convert anything or everything into coin operated, bill operated, card operated.

- Hardware Timer Controlled turn XBOX 360 or XBOX ONE , Play station 3 or 4, Xbox, PS 2, Power Device, laundry into coin op
- Turn your PC into Coin operated Internet, kiosk Game Kiosk, Application Kiosk System (WS)
- Internet Cafe, Cyber Cafe, Game Cafe Self Service Payment System (ICPS), Turn internet cafe into coin op
- Parts: Universal Multi Coin Acceptor AK5
- Note Validator / Bill Acceptor for Internet Kiosk
- Internet Cafe Kiosk Interface Board,(interface with any thirdly party coin acceptor and bill acceptor)
-
phone:905-279-7845 sales@weavefuture.com
-
 Products
- Xbox Playstation Wii U
- Card Operated for Wireless Controller
- Bill Operated Card Loader
- Card Loader by PC
- Customer Smart Cards
- Coin Operated for Wireless Controller
- Bill Operated for Wireless Controller
- HDMI Media Player
- Card Operated for Wired Controller
- Coin Operated for Wired Controller
- Bill Operated for Wired Controller
- Old WII TV
- Old Xbox
- PS2
- PC
- Washer Dryer
- Coin/Bill Operated Internet Kiosk
- Coin/Bill Operated Internet Cafe
- Water Vending
- Coin/Bill Operated Other Devices
- Jukebox Software
- Photo Booth Software
- Donation Box Software
- Metal Enclosures
- Helps and Forums
- Pictures from Customers
- Older Pictures
- Contact us
- Old Pages
- Xbox Playstation Wii U
 Xbox/Plastation/WII
-
 Wahser/Dryer
-
 Smart Card System
-
 Others
-
 Customers' Pictures
-
 Shop
Shop
 Forum
Forum Gallery
 Home
HomeThe other Car Wash Timer Board, you have to check their manual
Weavefuture Water Vending Controller Interface Board
The board will accept any pulse output coin acceptor or bill acceptor, for example Multi Coin Acceptor AC5 will output pulse signal to Water Vending Control Board. The Coin Op Timer Control board will control the Water valve device on/off for a period of time.The AC5 coin acceptor can recognize up to 5 types of coins
Coin Op Timer Control Board setting.
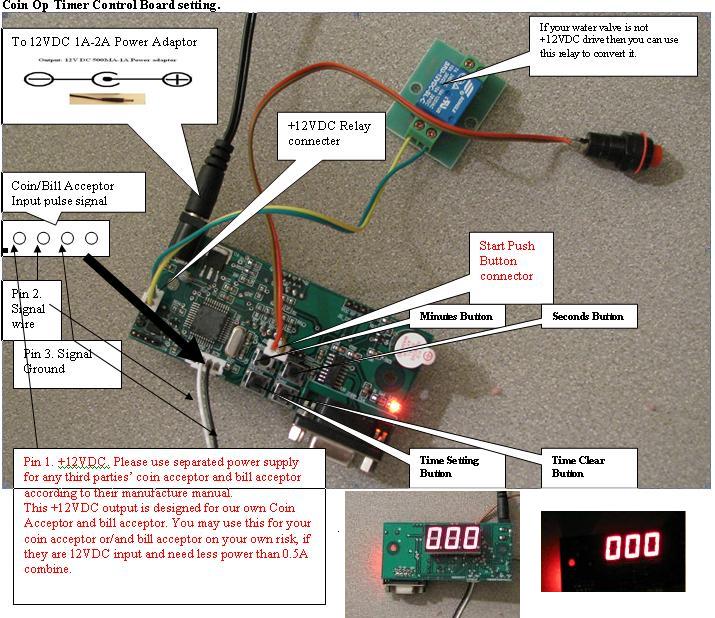
Time Setting Button: This is used to set the time in seconds for money credit to expire when the start button not pressed.
The default is 60 seconds. For example after the customer drop the money the
1. Set Timer to programmable mode:
Press and hold the Timer Setting Button for 3 seconds or more. The Display will show the previous setting,
(As shown in Picture: Display is number 8, means 8 seconds)
2. Change previous setting:
Press the Timer Setting Button for 1 second, the Display number will increase by 1. The number goes up by 1 seconds each time. Once it reaches 120 seconds, it will reset back to 1 seconds by one more press.
3. Change back to working mode:
Once Steps 1 and 2 are done, Press and hold the Timer Setting Button for 3 seconds or more. The display will show the desirable setting
Time Minutes Button: This is used to set the minutes that active the water valve to let water run.
The default is 0 seconds.
4. Set Timer to programmable mode:
Press and hold the Timer Minutes Button for 3 seconds or more. The Display will show the previous setting,
(As shown in Picture: Display is number 8, means 8 minutes)
5. Change previous setting:
Press the Timer Minutes Button for 1 second, the Display number will increase by 1. The number goes up by 1 minute each time. Once it reaches 60 minutes, it will reset back to 1 minute by one more press.
6. Change back to working mode:
Once Steps 1 and 2 are done, Press and hold the Timer Minutes Button for 3 seconds or more. The display will show the desirable setting
Time Seconds Button: This is used to set the seconds that active the water valve to let water run.
The default is 0 seconds.
7. Set Timer to programmable mode:
Press and hold the Timer Seconds button for 3 seconds or more. The Display will show the previous setting,
(As shown in Picture: Display is number 8, means 8 minutes)
8. Change previous setting:
Press the Timer Seconds Button for 1 second, the Display number will increase by 1. The number goes up by 1 second each time. Once it reaches 60 seconds, it will reset back to 1 second by one more press.
9. Change back to working mode:
Once Steps 1 and 2 are done, Press and hold the Timer Seconds Button for 3 seconds or more. The display will show the desirable setting
Time Seconds Button: This is used to set the seconds that active the water valve to let water run.
The default is 0 seconds.
10. Set Timer to programmable mode:
Press and hold the Timer Seconds button for 3 seconds or more. The Display will show the previous setting,
(As shown in Picture: Display is number 8, means 8 minutes)
11. Change previous setting:
Press the Timer Seconds Button for 1 second, the Display number will increase by 1. The number goes up by 1 second each time. Once it reaches 60 seconds, it will reset back to 1 second by one more press.
12. Change back to working mode:
Once Steps 1 and 2 are done, Press and hold the Timer Seconds Button for 3 seconds or more. The display will show the desirable setting
Time Clear Button: This is used to clear the time that of the water valve opening and close the water valve.
?